Multiple Artemis Instances
Setup with one instance
Artemis usually runs with one instance of the application server:

Setup with multiple instances
There are certain scenarios, where a setup with multiple instances of the application server is required. This can e.g. be due to special requirements regarding fault tolerance or performance.
Artemis also supports this setup (which is also used at TUM).
Multiple instances of the application server are used to distribute the load:

A load balancer (typically a reverse proxy such as nginx) is added, that distributes the requests to the different instances.
Note: This documentation focuses on the practical setup of this distributed setup.
More details regarding the theoretical aspects can be found in the Bachelor's Thesis
Securing and Scaling Artemis WebSocket Architecture, which can be found here:
Download PDF.
Additional synchronization
All instances of the application server use the same database, but other parts of the system also have to be synchronized:
- Database cache
- WebSocket messages
- File system
Each of these three aspects is synchronized using a different solution
Database cache
Artemis synchronizes distributed data through either Hazelcast, which is the default, or a Redis-compatible store. All instances must use the same provider. The distributed-data administration guide explains the operational differences and the required upgrade procedure for Redis and Valkey.
With Hazelcast, all Artemis instances form a cluster that synchronizes their cache. You can use the configuration
argument spring.hazelcast.interface to configure the interface on which Hazelcast will listen.
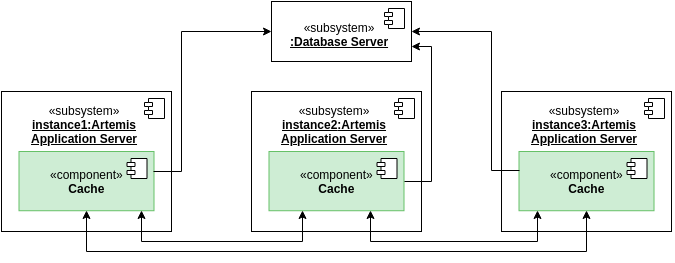
One problem that arises with a distributed setup is that all instances have to know each other in order to create this cluster. This is problematic if the instances change dynamically. Artemis uses a discovery service to solve the issue (named JHipster Registry).
Discovery service
JHipster registry contains Eureka, the discovery service where all instances can register themselves and fetch the other registered instances.
Eureka can be configured like this within Artemis:
# Eureka configuration
eureka:
    client:
        enabled: true
        service-url:
            defaultZone: {{ artemis_eureka_urls }}
instance:
    prefer-ip-address: true
    ip-address: {{ artemis_ip_address }}
    appname: Artemis
    instanceId: Artemis:{{ artemis_eureka_instance_id }}

logging:
    file:
        name: '/opt/artemis/artemis.log'
{{ artemis_eureka_urls }} must be the URL where Eureka is reachable,
{{ artemis_ip_address }} must be the IP under which this instance is reachable and
{{ artemis_eureka_instance_id }} must be a unique identifier for this instance.
You also have to set up the value jhipster.registry.password to the password of the registry
(which you will set later).
Note that Hazelcast (which requires Eureka) is by default binding to 127.0.0.1 to prevent other instances
to form a cluster without manual intervention.
If you set up the cluster on multiple machines (which you should do for a production setup),
you have to set the value spring.hazelcast.interface to the ip-address of the machine.
Hazelcast will then bind on this interface rather than 127.0.0.1,
which allows other instances to establish connections to the instance.
This setting must be set for every instance, but you have to make sure to adjust the ip-address correspondingly.
Setting up the Discovery Service
Installation
-
Create the directories
/opt/registry/and/opt/registry/config-server. -
Download the application
Download the latest version of the jhipster-registry JAR from GitHub: https://github.com/jhipster/jhipster-registry/releases/.
Service configuration
-
Configure
/etc/systemd/system/registry.service:[Unit]Description=RegistryAfter=syslog.target[Service]User=artemisWorkingDirectory=/opt/registryExecStart=/usr/bin/java \-Xmx256m \-jar registry.jar \--spring.profiles.active=prod,nativeSuccessExitStatus=143StandardOutput=/opt/registry/registry.log[Install]WantedBy=multi-user.target -
Set Permissions in Registry Folder
chown -R artemis:artemis /opt/registrychmod g+rwx /opt/registry -
Enable the service
systemctl daemon-reloadsystemctl enable registry.service -
Start service
systemctl start registry -
Check the logs for issues
journalctl -u registry --since=10m -f
Configuration
-
/opt/registry/application-prod.ymllogging:file:name: '/opt/registry/registry.log'jhipster:security:authentication:jwt:base64-secret: THE-SAME-TOKEN-THAT-IS-USED-ON-THE-ARTEMIS-INSTANCESregistry:password: AN-ADMIN-PASSWORD-THAT-MUST-BE-CHANGEDspring:security:user:password: AN-ADMIN-PASSWORD-THAT-MUST-BE-CHANGED -
/opt/registry/bootstrap-prod.ymljhipster:security:authentication:jwt:base64-secret: THE-SAME-TOKEN-THAT-IS-USED-ON-THE-ARTEMIS-INSTANCESsecret: ''spring:cloud:config:server:bootstrap: truecomposite:- type: nativesearch-locations: file:./config-server -
/opt/registry/config-server/application.yml# Common configuration shared between all applicationsconfigserver:name: Artemis JHipster Registrystatus: Connected to the Artemis JHipster Registryjhipster:security:authentication:jwt:secret: ''base64-secret: THE-SAME-TOKEN-THAT-IS-USED-ON-THE-ARTEMIS-INSTANCESeureka:client:service-url:defaultZone: http://admin:${jhipster.registry.password}@localhost:8761/eureka/
nginx config
You still have to make the registry available:
-
/etc/nginx/sites-available/registry.confserver {listen 443 ssl http2;server_name REGISTRY_FQDN;ssl_session_cache shared:RegistrySSL:10m;include /etc/nginx/common/common_ssl.conf;add_header Strict-Transport-Security "max-age=63072000; includeSubDomains; preload";add_header X-Frame-Options DENY;add_header Referrer-Policy same-origin;client_max_body_size 10m;client_body_buffer_size 1m;location / {proxy_pass http://localhost:8761;proxy_read_timeout 300;proxy_connect_timeout 300;proxy_http_version 1.1;proxy_redirect http:// https://;proxy_set_header Host $http_host;proxy_set_header X-Real-IP $remote_addr;proxy_set_header X-Forwarded-For $proxy_add_x_forwarded_for;proxy_set_header X-Forwarded-Proto $scheme;gzip off;}} -
ln -s /etc/nginx/sites-available/registry.conf /etc/nginx/sites-enabled/This enables the registry in nginx.
-
systemctl restart nginxThis will apply the config changes and the registry will be reachable.
WebSockets
WebSockets should also be synchronized (so that a user connected to one instance can perform an action which causes an update to users on different instances, without having to reload the page - such as quiz starts). We use a so-called broker for this (named Apache ActiveMQ Artemis).
It relays message between instances:

Setting up the WebSocket Broker
-
Create a folder
/opt/activemq-distribution/to store ActiveMQ. -
Download ActiveMQ here: https://activemq.apache.org/components/artemis/download/
-
Extract the downloaded contents
cd /opt/activemq-distributiontar -xf activemq.tar.gz -
Navigate to the folder with the CLI
cd /opt/activemq-distribution/apache-artemis-2.41.0/bin -
Create a broker in the
/opt/broker/broker1directory, replaceUSERNAMEandPASSWORDaccordingly./artemis create --user USERNAME --password PASSWORD --require-login /opt/broker/broker1 -
Adjust the permissions
chown -R artemis:artemis /opt/brokerchmod g+rwx /opt/broker -
Adjust the configuration of the broker in
/opt/broker/broker1/etc/broker.xml.<?xml version='1.0'?><configuration xmlns="urn:activemq"xmlns:xsi="http://www.w3.org/2001/XMLSchema-instance"xmlns:xi="http://www.w3.org/2001/XInclude"xsi:schemaLocation="urn:activemq /schema/artemis-configuration.xsd"><core xmlns="urn:activemq:core" xmlns:xsi="http://www.w3.org/2001/XMLSchema-instance"xsi:schemaLocation="urn:activemq:core "><name>0.0.0.0</name><journal-pool-files>10</journal-pool-files><acceptors><!-- STOMP Acceptor. --><acceptor name="stomp">tcp://0.0.0.0:61613?tcpSendBufferSize=1048576;tcpReceiveBufferSize=1048576;protocols=STOMP;useEpoll=true;heartBeatToConnectionTtlModifier=6</acceptor></acceptors><connectors><connector name="netty-connector">tcp://localhost:61616</connector></connectors><security-settings><security-setting match="#"><permission type="createNonDurableQueue" roles="amq"/><permission type="deleteNonDurableQueue" roles="amq"/><permission type="createDurableQueue" roles="amq"/><permission type="deleteDurableQueue" roles="amq"/><permission type="createAddress" roles="amq"/><permission type="deleteAddress" roles="amq"/><permission type="consume" roles="amq"/><permission type="browse" roles="amq"/><permission type="send" roles="amq"/><!-- we need this otherwise ./artemis data imp wouldn't work --><permission type="manage" roles="amq"/></security-setting></security-settings><address-settings><!--default for catch all--><address-setting match="#"><dead-letter-address>DLQ</dead-letter-address><expiry-address>ExpiryQueue</expiry-address><redelivery-delay>0</redelivery-delay><!-- with -1 only the global-max-size is in use for limiting --><max-size-bytes>-1</max-size-bytes><message-counter-history-day-limit>10</message-counter-history-day-limit><address-full-policy>PAGE</address-full-policy><auto-create-queues>true</auto-create-queues><auto-create-addresses>true</auto-create-addresses><auto-create-jms-queues>true</auto-create-jms-queues><auto-create-jms-topics>true</auto-create-jms-topics></address-setting></address-settings></core></configuration> -
Service configuration:
/etc/systemd/system/broker1.service[Unit]Description=ActiveMQ-BrokerAfter=network.target[Service]User=artemisWorkingDirectory=/opt/broker/broker1ExecStart=/opt/broker/broker1/bin/artemis run[Install]WantedBy=multi-user.target -
Enable the service
systemctl daemon-reloadsystemctl enable broker1systemctl start broker1
Configuration of Artemis
Add the following values to your Artemis config:
spring:
    websocket:
        broker:
            username: USERNAME
            password: PASSWORD
            addresses: "localhost:61613"
USERNAME and PASSWORD are the values used in step 5.
Replace localhost if the broker runs on a separate machine.
File system
The last (and also easiest) part to configure is the file system: You have to provide a folder that is shared between all instances of the application server (e.g. by using NFS).
You then have to set the following values in the application config:
artemis:
    repo-clone-path: {{ artemis_repo_basepath }}/repos/
    repo-download-clone-path: {{ artemis_repo_basepath }}/repos-download/
    file-upload-path: {{ artemis_repo_basepath }}/uploads
    submission-export-path: {{ artemis_repo_basepath }}/exports
Where {{ artemis_repo_basepath }} is the path to the shared folder
The file system stores (as its names suggests) files, these are e.g. submissions to file upload exercises, repositories that are checked out for the online editor, course icons, etc.
Scheduling
Artemis uses scheduled tasks in various scenarios: e.g. to lock repositories on due date, clean up unused resources, etc. As we now run multiple instances of Artemis, we have to ensure that the scheduled tasks are not executed multiple times. Artemis uses to approaches for this:
-
Tasks for quizzes (e.g. evaluation once the quiz is due) are automatically distributed (using Hazelcast)
-
Tasks for other exercises are only scheduled on one instance:
You must add the scheduling profile to exactly one instance of your cluster.
This instance will then perform scheduled tasks whereas the other instances will not.
nginx configuration
You have to change the nginx configuration (of Artemis) to ensure that the load is distributed between all instances. This can be done by defining an upstream (containing all instances) and forwarding all requests to this upstream.
upstream artemis {
    server instance1:8080;
    server instance2:8080;
}
Overview
All instances can now communicate with each other on 3 different layers:
- Database cache
- WebSockets
- File system
You can see the state of all connected instances within the registry. It relays message between instances:

Deploying a New Version
Artemis is not deployed as a rolling update. A new version is deployed by stopping the cluster and bringing it back up in a defined order, so that no instance ever serves traffic against a schema it was not built for:
- Stop every Artemis instance.
- Start the first instance on its own, and wait until it has fully initialized. This is the instance that applies the Liquibase migrations of the new version.
- Once the migrations have finished and the first instance is up, start the remaining instances.
Starting several instances at once is what this order avoids. Liquibase takes a lock on its own changelog table, so a second instance starting mid-migration waits for that lock rather than corrupting anything, but it waits without a useful timeout and reports nothing about why. Waiting for the first instance is both faster and easier to diagnose.
Integrated Code Lifecycle
The integrated code lifecycle (ICL) can integrate build agents into a multi instance server setup. In ICL, we differentiate between two types of server node: core nodes and build agent nodes. Core nodes provide the full Artemis functionality, while build agents simply execute build jobs for the testing of programming exercises. Both node types run the Artemis application, albeit with different profile sets and different application configuration files. Compared to core nodes, build agents nodes are much more light-weight, as they have less service dependencies and provide less functionality. Thus, they require less system resources and start much quicker than core nodes.
The previously mentioned steps concerning the multiple Artemis instance setup remain unchanged, as we only need to adapt the run and application configurations for each node.
Core nodes
Core nodes serve the main functionality of Artemis. In ICL, this additionally includes the CI Management, responsible for managing and interacting with the build job queue (adding, cancelling and viewing build jobs), and the Local VC system.
For ICL, the run configuration for core nodes need to include the additional profiles core, localvc and localci, e.g.:
--spring.profiles.active=prod,core,localvc,localci,scheduling
To enable LTI integration, add --artemis.lti.enabled=true to your configuration.
To enable Iris integration, add --artemis.iris.enabled=true to your configuration.
To enable LDAP-based user synchronization, add --artemis.user-management.ldap.enabled=true to your configuration.
To enable Athena-based feedback suggestions, add --artemis.athena.enabled=true to your configuration.
Core nodes do not require further adjustments to the application-prod.yml, as long as you have added the necessary variables as described in the Integrated Code Lifecycle Setup.
Build Agents
Build agents can be added to and removed from the server cluster depending on the build capacity needed to conduct the automatic assessment of programming exercises. If desired, build agents can execute multiple build jobs concurrently. In this case, you need to make sure that the server node your build agents is running on has enough resources. We recommend at least 2 CPUs and 2 GB of RAM for each concurrently running build job.
Build agents do not require access to the Shared File System, because they clone the repositories used in the build jobs over the network: over SSH when
artemis.version-control.build-agent-use-ssh is true, and otherwise over HTTPS. Furthermore, as Build Agents do not handle client requests,
they should be left out from the nginx configuration.
The run configuration contains just two profiles:
--spring.profiles.active=prod,buildagent
Build agents depend on much fewer services than the core nodes, thus we can adapt the application-prod.yml to exclude some of these dependencies.
This heavily reduces the application start up time and resource demand.
You can make following adaptations to the application-prod.yml:
-
Disable Liquibase and loadbalancer cache:
spring:liquibase:enabled: falsecloud:loadbalancer:cache:enabled: false -
Autoconfigure exclusions:
spring:autoconfigure:exclude:# Hibernate and DataSource are not needed in the build agent- org.springframework.boot.autoconfigure.orm.jpa.HibernateJpaAutoConfiguration- org.springframework.boot.autoconfigure.jdbc.DataSourceAutoConfiguration# Those metrics are repeated here, because overriding the `exclude` array is not possible- org.springframework.boot.actuate.autoconfigure.metrics.data.RepositoryMetricsAutoConfiguration- org.springframework.boot.actuate.autoconfigure.metrics.jdbc.DataSourcePoolMetricsAutoConfiguration- org.springframework.boot.actuate.autoconfigure.metrics.startup.StartupTimeMetricsListenerAutoConfiguration- org.springframework.boot.actuate.autoconfigure.metrics.task.TaskExecutorMetricsAutoConfiguration- org.springframework.boot.actuate.autoconfigure.metrics.web.tomcat.TomcatMetricsAutoConfiguration -
Furthermore, you will need some configuration related to version control and continuous integration.
Build agents need to reach the VC server to clone repositories. They authenticate themselves: over HTTPS with the clone token of the build job they are running, or with an SSH key as described after the example below. Neither needs any configuration here.
artemis:version-control:url: <url-to-your-vc-server>default-branch: main # The branch that should be used as default branch for all newly created repositories. This does NOT have to be equal to the default branch of the VCSBuild agents need no credential from you here. Choose in this order:
- SSH keys, recommended. Set
artemis.version-control.build-agent-use-ssh: truetogether withssh-template-clone-urlandssh-private-key-folder-path. Every agent then generates its own key pair at startup and publishes only the public key — nothing to distribute or rotate. Roll it out on the build agents first (localvc nodes accept a registered agent's key regardless of their own setting, so builds keep working) and on the localvc nodes afterwards. A clone or fetch over SSH may stall without data transfer for at mostartemis.version-control.build-agent-clone-timeout-seconds(default 60) per transport phase before the build fails; raise it if builds for exercises with several repositories time out while the VCS node is loaded. - Build job clone tokens, used automatically over HTTPS while
build-agent-use-sshisfalse. This needs no configuration at all.
Do not set
build-agent-git-usernameorbuild-agent-git-passwordon these nodes — a node that runs local CI refuses to start with either of them configured, whether or not the agents use SSH. The pair is a static secret opening every repository that nothing here needs, and it belongs only to a localvc node without local CI, which is Jenkins with LocalVC.Note that a multi-node setup terminates SSH on the load balancer, which hides the real client from the SSH server. Enable PROXY protocol in the nginx
streamblock and list the balancer inartemis.version-control.ssh-proxy-protocol.trusted-sourceson every localvc node; the Docker Compose files in this repository already do both. See Build Agent Authentication for this and for restricting which networks build agents may connect from. - SSH keys, recommended. Set
-
Configuration related to the execution of build jobs:
artemis:continuous-integration:build-runner: docker # Supported values: docker, kubernetes. See Build Runners.docker-connection-uri: unix:///var/run/docker.sockspecify-concurrent-builds: true # Set to false, if the number of concurrent build jobs should be chosen automatically based on system resourcesconcurrent-build-size: 1 # If previous value is true: Set to desired value but keep available system resources in mindasynchronous: truebuild-container-prefix: local-ci-image-cleanup:enabled: true # If set to true (recommended), old Docker images will be deleted on a schedule.expiry-days: 2 # The number of days since the last use after which a Docker image is considered outdated and can be removed.cleanup-schedule-time: 0 0 3 * * * # CRON expression for cleanup schedulecontainer-cleanup:expiry-minutes: 5 # Time after a hanging container will automatically be removedcleanup-schedule-minutes: 60 # Schedule for container cleanupbuild-agent:short-name: "artemis-build-agent-X" # Short name of the build agent. This should be unique for each build agent. Only lowercase letters, numbers and hyphens are allowed.display-name: "Artemis Build Agent X" # This value is optional. If omitted, the short name will be used as display name. Display name of the build agent. This is shown in the Artemis UI.build-timeout-seconds:max: 240 # (Optional, default 240) Maximum time in seconds a build job is allowed to run. If a build job exceeds this time, it will be cancelled.
Please note that artemis.continuous-integration.build-agent.short-name must be provided. Otherwise, the build agent will not start.
The settings above configure the default Docker build runner, which executes each build in a container on the build agent host. Artemis also ships a proof-of-concept Kubernetes runner that executes each build as a namespaced Kubernetes Job instead, so the build-agent pods need no Docker socket. LocalCI Build Runners compares both and documents how to configure and deploy them.
Build agents run as Hazelcast Lite Members and require a full member, in our case a core node, to be running. Thus, before starting a build agent make sure that at least the primary node is running. You can then add and remove build agents to the cluster as desired.
You can verify that a build agent has been successfully added to the cluster by checking the Build Agent View in the Server Administration. It may take a few seconds for the build agent to show up:

Running multiple instances locally
For testing purposes, you can also run multiple instances on the same machine. You can do this by using different ports and a unique instance ID for each instance.
-
In
application-local.yml, add the following configuration:eureka:client:enabled: true -
Create additional run configurations for each instance. You will have to add CLI arguments to each additional run configuration to set the instance ID and the port, e.g.
--server.port=8081 --eureka.instance.instanceId="Artemis:2". Also, make sure that only one instance has theschedulingprofile enabled: -
Start the registry service, e.g., by running
docker compose --env-file .env -f docker/broker-registry.yml up. -
Start the first instance with the default run configuration (no additional CLI arguments,
schedulingenabled) and wait until it is up and running. -
Start the remaining instances.

You should now be able to see all instances in the registry interface at http://localhost:8761.
Running multiple instances locally with Docker
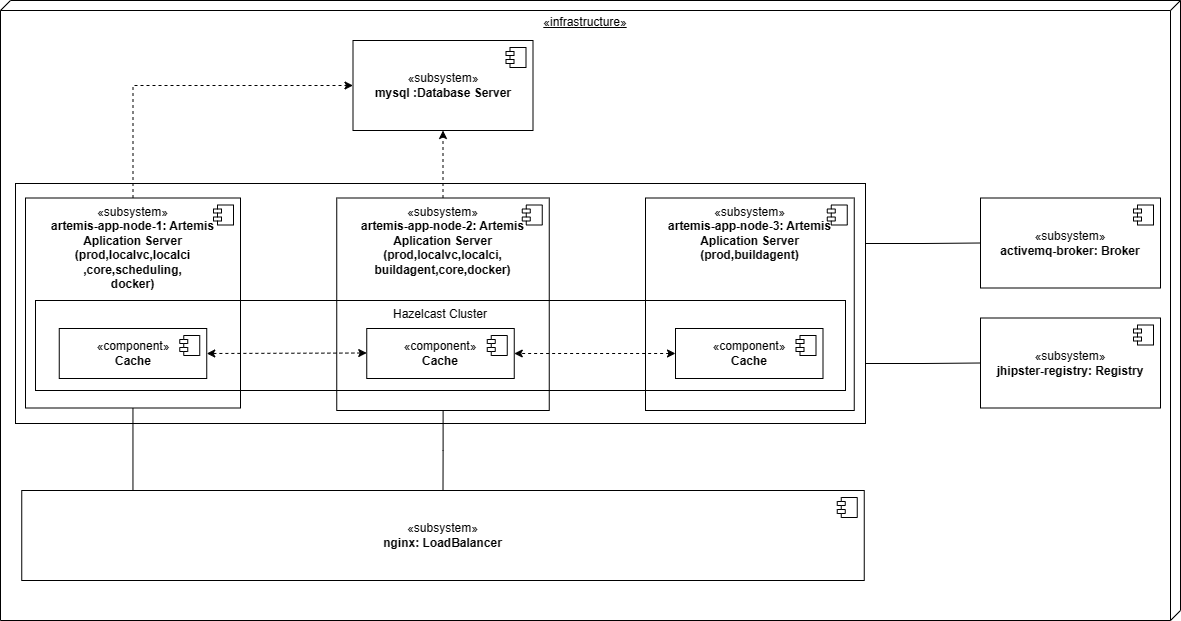
You can also run multiple instances of Artemis locally using Docker. This will start 3 Artemis instances, each running in its own container. A load balancer (nginx) will be used to distribute the requests to the different instances. The load balancer will be running in a separate container and will be accessible on ports 80/443 of the host system. The instances will be registered in the registry service running on a separate container. The instances will use the registry service to discover each other and form a Hazelcast cluster. Further details can be found in Database Cache. The instances will also use a ActiveMQ Artemis broker to synchronize WebSocket messages. Further details can be found in WebSockets. In summary, the setup will look like this:
- 3 Artemis instances:
- artemis-app-node-1: using following spring profile:
prod,localvc,localci,core,scheduling,docker - artemis-app-node-2: using following profile:
prod,localvc,localci,buildagent,core,docker - artemis-app-node-3: using following profile:
prod,buildagent
- artemis-app-node-1: using following spring profile:
- A MySQL database addressable on port 3306 of the host system
- A Load balancer (nginx) addressable on ports 80/443 of the host system:
http(s)://localhost. - A Registry service addressable on port 8761 of the host system: http://localhost:8761
- An ActiveMQ broker
These instances run under the prod profile, and docker/artemis/config/prod-multinode.env therefore does not contain a
JWT signing key: a key committed to the repository would be readable by everyone. Export one before starting the
containers, so that all three instances share it:
export ARTEMIS_E2E_JWT_SECRET="$(openssl rand -base64 64 | tr -d '\n')"
The E2E runner scripts (run-e2e-tests-local-multinode.sh and its variants) do this for you.
Linux setup
-
When running the Artemis container on a Unix system, you will have to give the user running in the container permission to access the Docker socket by adding them to the docker group. You can find the group ID of the docker group by running
getent group docker | cut -d: -f3. Afterwards, add the following line to the.envfile in the repository root, which is the file the start command below loads:DOCKER_GROUP_ID=<REPLACE_WITH_DOCKER_GROUP_ID_OF_YOUR_SYSTEM> -
The docker compose setup which we will use will mount some local directories (namely the ones under docker/.docker-data) into the containers. To ensure that the user running in the container has the necessary permissions to these directories, you will have to change the owner of these directories to the user running in the container (User with ID 1337). You can do this by running the following command:
sudo chown -R 1337:1337 docker/.docker-data -
Start the docker containers by running the following command:
docker compose --env-file .env -f docker/test-server-multi-node-mysql-localci.yml up -
You can now access artemis on
http(s)://localhostand the registry on http://localhost:8761.
Windows setup
-
When running the Artemis container on a Windows system, you will have to change the value for the Docker connection URI. You need to change the value of the environment variable
ARTEMIS_CONTINUOUSINTEGRATION_DOCKERCONNECTIONURIin the filedocker/artemis/config/prod-multinode.envtotcp://host.docker.internal:2375. -
Start the docker containers by running the following command:
docker compose --env-file .env -f docker/test-server-multi-node-mysql-localci.yml up -
You can now access artemis on
http(s)://localhostand the registry on http://localhost:8761.
MacOS setup
-
Make sure to enable "Allow the default Docker socket to be used (requires password)" in the Docker Desktop settings. This can be found under Settings > Advanced in Docker Desktop.
-
Define the operator name
INFO_OPERATORNAME='Some Artemis Dev'in the filedocker/artemis/config/node1.env. -
Start the docker containers by running
docker compose --env-file .env -f docker/test-server-multi-node-mysql-localci.yml up -
You can now access artemis on
http(s)://localhostand the registry on http://localhost:8761.