Development Process

Submit a Feature Request
The initial step in our development process involves the creation of a feature request, which is accomplished through the submission of a GitHub Issue. This action can be performed by any stakeholder, including developers, users, or maintainers. The feature request should include a detailed description of the desired functionality, as well as any relevant information that may be useful to the development team. This information should include the rationale for the feature, the expected benefits, and any potential risks or challenges that may be associated with the implementation of the feature.
Evaluate Feature Request
Once a feature request has been submitted, the maintainers will evaluate the request together with the development team to determine its feasibility and potential impact on the system.
Create a Feature Proposal
If the feature request is deemed feasible, the development team will create a feature proposal that extensively describes the proposed feature. This step will consist of the artifacts mentioned in the model "Create Feature Proposal" below:
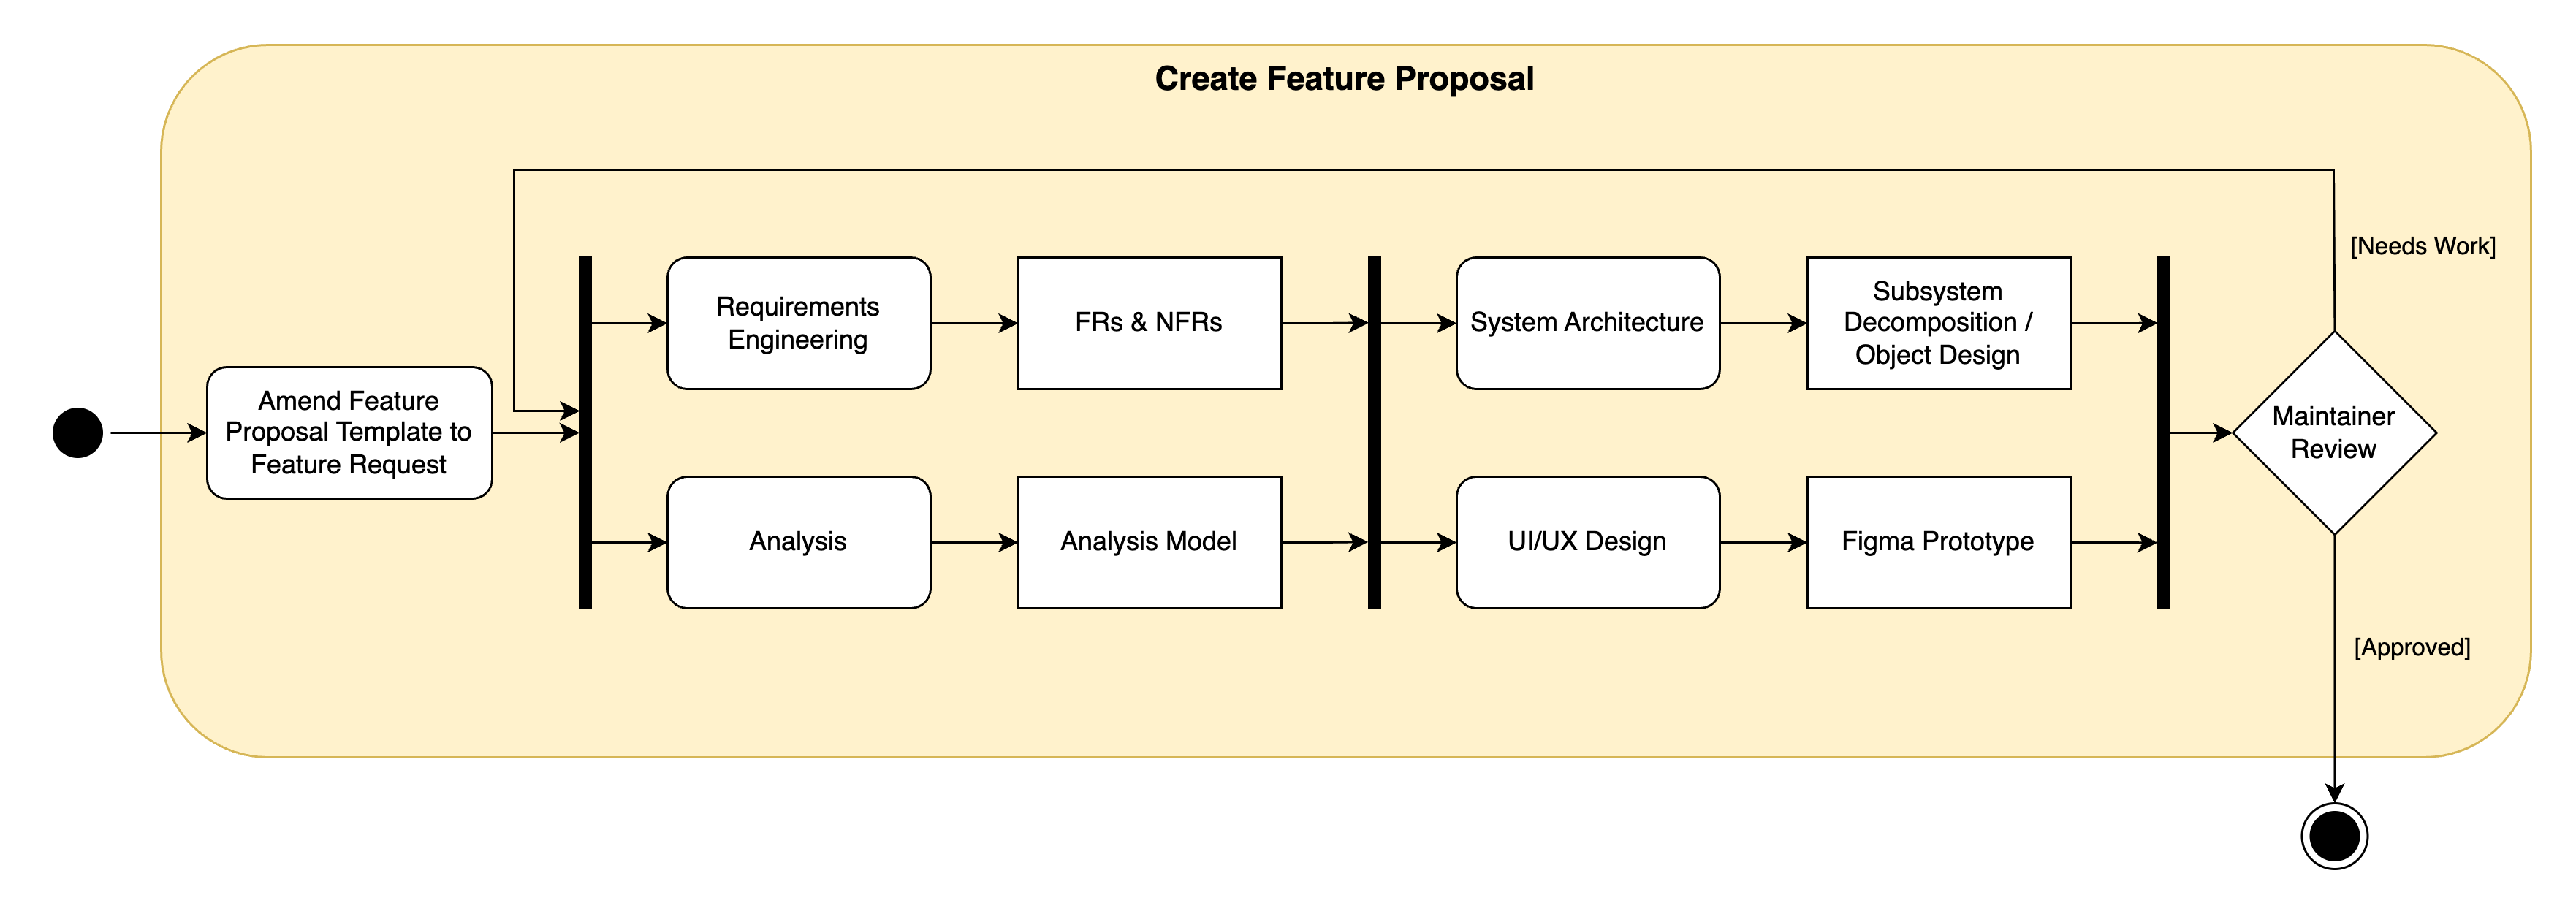
Append Feature Proposal Template to Feature Request on GitHub
The Feature Proposal Template outlines the structure of the feature proposal and provides a guideline for the development team to follow.
We have developed a GitHub Action that automatically appends the feature proposal template to the issue description once the issue is tagged with 'needs-feature-proposal.' Additionally, when someone is assigned to such an issue, an instructional comment is automatically added. This comment reminds the assignee to fill out the feature proposal and provides a link to the relevant documentation for further guidance.
Requirements Engineering
In this section, the foundation for the feature's development is laid by meticulously defining both functional and non-functional requirements. Functional requirements detail what the feature will do, covering specific behaviors or functions. Non-functional requirements, on the other hand, address the feature's operation, such as performance, usability, reliability, and security specifications.
In the Feature Proposal Template, you can find examples for structuring such functional and non-functional requirements.
Analysis
Within the analysis section, the emphasis is on understanding and documenting the feature's intended behavior and interactions within the system. This includes creating an Analysis Object Model, which represents the static structure of the system using class diagrams to identify key entities and their relationships. Additionally, dynamic aspects of the feature are explored through Activity Diagrams (for workflow representation), State Chart Diagrams (to model the feature's states and transitions), and Communication Diagrams (illustrating how objects interact to achieve the feature's functionality). These models serve as a blueprint for the development and ensure a shared understanding among all people working on Artemis.
System Architecture
In this step, the high-level structure of the system supporting the feature is outlined, focusing on analyzing the system components relevant to the implementation of the feature, subsystem decomposition, interfaces, persistent data management, and security aspects. The subsystem decomposition process is used to identify the main components of the system and define their responsibilities, which facilitates modular development and maintenance. It is important to define the interfaces between these subsystems to ensure seamless interaction and integration. In addition, the development of a comprehensive data model is important for a clear understanding of how data is securely stored, retrieved, and managed within the system, taking into account both logical and physical data perspectives. Security aspects, especially access control mechanisms, are considered to ensure data integrity and privacy.
UI/UX Design
If the proposed feature requires a change to the software's user interface, this section should include a detailed description of the proposed changes, as well as a mockup that illustrates the new user interface. The mockup should be created using Figma in conjunction with the Artemis Design System and should be added to the feature proposal as a screenshot. Furthermore it is important to include a description of the user flow that references the dynamic model created in the analysis section.

Create a local Branch
We use the following structure for branch names: <type>/<area>/<short-description>
- Possible types are: feature, chore, and bugfix
- Possible areas are all allowed feature tags (see PR Naming Conventions), written kebab-case. For example,
Programming exercisesbecomes programming-exercises.
Implement the Feature
In this step, the development team converts the detailed plans and designs outlined in the functional proposal into working code. This step requires careful adherence to the previously defined requirements and system architecture to ensure that the function fits seamlessly into the existing system and fulfills the specified functional and performance criteria.
Create a Pull Request
After the feature implementation is complete, the developer is required to create a pull request for integrating the feature into the develop branch. The subsequent sections provide guidance on the naming conventions and outline the necessary steps for creating and merging a pull request.
Naming Conventions for GitHub Pull Requests
-
The first term is a main feature of Artemis and should use code highlighting, e.g.
Programming exercises:Administration,Lectures,Tutorial groups,Communication,Notifications,Exercises,Programming exercises,Quiz exercises,Modeling exercises,Text exercises,File upload exercises,Team exercises,Exam mode,Integrated code lifecycle,LocalCI,LocalVC,Assessment,Grading,Plagiarism checks,Learning analytics,Adaptive learning,Learning path,Iris,Hyperion,Athena,Global search,Integrated markdown editor,Mobile apps,Scalability,Usability,Performance,Infrastructure,Migration.- If the change is not visible to end users, or it is a pure development or test improvement, we use the term
Development. - Everything else belongs to the
Generalcategory.
- If the change is not visible to end users, or it is a pure development or test improvement, we use the term
-
The colon is not highlighted.
-
After the colon, there should be a verbal form that is understandable by end users and non-technical persons, because this will automatically become part of the release notes.
- The text should be short, non-capitalized (except the first word) and should include the most important keywords. Do not repeat the feature if it is possible.
- We generally distinguish between bugfixes (the verb "Fix") and improvements (all kinds of verbs) in the release notes. This should be immediately clear from the title.
- Good examples:
- "Allow instructors to delete submissions in the participation detail view"
- "Fix an issue when clicking on the start exercise button"
- "Add the possibility for instructors to define submission policies"
Pull Request Readiness
The author owns the PR description, checklist, labels and milestone throughout review. These requirements apply to human developers and coding agents alike, including small fixes and documentation changes.
Prepare the Description and Checklist
Use the PR template. Explain the problem and solution, link the related issue when applicable, and provide reproducible testing steps and evidence of checks run. Replace example text and remove empty or irrelevant sections.
Before requesting review, go through every item in the author Checklist:
- Check completed, applicable tasks with
- [x]only after actually doing the work. - Delete tasks that do not apply, along with sections that become empty. For example, remove client tasks and UI screenshots for a documentation-only change. Explain an omission if its applicability is unclear.
- Keep unfinished, applicable tasks unchecked, including CI and validation that will finish during review. Do not delete an applicable task merely to make the checklist appear complete. Draft status depends on whether the implementation is finished, not on whether every validation task is complete.
The Review Progress checklist tracks work performed during review. Keep applicable code review, manual test, exam mode and performance items unchecked until those reviews or tests have actually happened. Remove only items that do not apply; required code reviews remain. When later changes invalidate a completed review or test, uncheck the affected item and request verification again. Before merge, every remaining task in the entire PR description must be checked.
Set the Milestone
Set the PR's Milestone to the intended Artemis release before requesting review, and keep it current if the release target changes. An issue's milestone does not replace the PR's milestone. If the intended release is unclear or you cannot edit milestones, ask a maintainer to assign it and make the missing milestone explicit; do not silently leave it unset or guess a release.
Maintain the Readiness Labels
GitHub's draft state and the repository labels serve different purposes. Marking a draft Ready for review changes its state; the ready for review label makes it discoverable in the team's review queue.
Use drafts only for unfinished implementations. Open a completed implementation as a non-draft PR, or mark it Ready for review as soon as the implementation is finished. Draft PRs keep relevant style, lint, architecture and type checks, including test TypeScript compilation in Quality / Client Compilation. They also keep the WAR and draft test-server image builds. Server, client and AI worker sandbox tests, E2E, CodeQL and automated review bots are deferred. Integration-test feedback arrives after leaving draft or requesting a manual full CI run, so waiting for those results before leaving draft prevents normal validation from starting. Pending or failing CI, outstanding reviews and test-server validation do not by themselves require draft status. Record that work honestly in the checklist and complete it before merge.
A successful draft CI run reports Draft checks passed (tests deferred). It does not publish the required All required CI Passed check for an untested revision. Marking the PR Ready for review starts normal CI even when the commit has not changed. Ready PRs run the relevant suites with conservative affected selection and full-suite fallbacks; wait for the required checks before merging. Relevant ready PRs also require Sonar's new-code quality gate; affected runs provide measured coverage without rerunning complete suites. Fork PRs require a maintainer-reviewed exact-source analysis before the secretless gate can pass. See the Sonar workflow policy. To request full validation while a PR is still in draft, run CI manually on its branch with Bypass change detection and run every job enabled. Manual runs use full suites when selected on draft branches too; without the bypass, area filtering can skip an irrelevant Test stage.
| Stage | Author's action |
|---|---|
| Implementation is unfinished | Keep the PR in draft and remove ready for review and ready to merge. |
| Implementation is complete | Prepare the description, record completed and pending validation, and set the milestone. Open a non-draft PR or mark it Ready for review, verify ready for review is present, and follow CI and automated reviews while they run. |
| Ready for maintainer merge | Verify at least four reviewer approvals, including required maintainer reviews, all remaining tasks checked, all review threads resolved, passing required checks, no merge conflicts and the correct milestone. Replace ready for review with ready to merge. |
The ready-for-review workflow adds ready for review when a draft transitions to ready. If the PR was opened without a draft, add the label yourself. If you cannot edit labels, ask a maintainer to update them.
Adding ready to merge triggers a validator for unchecked tasks and unresolved review threads. It can remove the label and explain what remains. Fix the reported issues before re-adding it. This check does not verify approvals, CI results or the milestone; the author still verifies every merge requirement.
Keep labels accurate after each update. Remove ready to merge whenever a merge requirement no longer holds. Keep ready for review while CI, validation or reviews are pending. Return to draft and remove both labels only when the implementation becomes unfinished again. A maintainer performs the final merge.
Steps to Create and Merge a Pull Request
Preconditions (For Developers Only)
- Merge fast: PRs should only be open for a couple of days.
- Limit yourself to one functionality per pull request.
- Split up your task in multiple branches & pull requests if necessary.
- Commit Early, Commit Often, Perfect Later, Publish Once.
Begin Implementation (For Developers Only)
- If you open a pull request while the implementation is unfinished, use a draft pull request for early questions and discussion.
Complete Implementation (For Developers Only)
- Record completed author tasks and prepare the description, milestone and labels according to Pull Request Readiness. Pending validation and review tasks stay open until verified.
- Add or update the "Steps for Testing" in the description of your pull request.
- Make sure that the changes in the pull request are only the ones necessary.
- Make sure that the PR is up-to-date with develop.
- Open the completed implementation as a non-draft PR, or mark the pull request as ready for review immediately. Follow the full CI run and automated reviews; do not wait for them before leaving draft.
Review Process
For Developers:
- Organize or join a testing session. Especially for large pull requests this makes testing a lot easier.
- Actively look for reviews. Do not just open the pull request and wait.
For Reviewers:
- Perform the "Steps for Testing" and verify that the new functionality is working as expected.
- Verify that related functionality is still working as expected.
- Ensure that the code changes...
- conform to the code style and code design guidelines.
- are easily understandable.
- contain thorough documentation where applicable.
- maintain reasonable performance (e.g. no excessive/unnecessary database queries or HTTP calls).
- Respect the PR scope: Implementations that are unrelated to the PRs topic should not be enforced in a code review.
- Explain your rationale when requesting changes: E.g., not "Please change X to Y", but "Please change X to Y, because this would improve Z"
- Submit your comments and status (✅ Approve or ❌ Request Changes) using GitHub.
- Explain what you did (test, review code) and on which test server in the review comment.
Address Review Comments
For Developers:
- Use the pull request to discuss comments or ask questions.
- Update your code where necessary.
- Remove ready to merge when revisions invalidate merge readiness. Return to draft and remove ready for review only while the implementation is unfinished again.
- Once the implementation is complete, mark it ready for review immediately and verify the ready for review label is present, even if CI or other validation is still pending.
- After making revisions, re-request reviews through GitHub initially. If you receive no response, then follow up with a targeted message on Slack to the relevant reviewers.
- Comment on "inline comments" (e.g. "Done").
- Once all changes are made, ensure that the feature-specific maintainer reviews and approves the changes.
- After maintainer approval, an "Artemis Maintainer" reviews and finalizes the approval process.
For Reviewers:
- Respond to questions raised by the developer.
- Mark conversations as resolved if the change is sufficient.
- Feature-specific maintainers should verify changes within their scope and mark them as approved.
- Artemis Maintainers conduct the final review before merging.
Merge Changes
Once the merge requirements are satisfied, replace ready for review
with ready to merge. A project maintainer merges your changes into the develop branch.
Stale Bot
If the pull request doesn't have any activity for at least 7 days, the Stale Bot will mark the PR as stale.
The stale status can simply be removed by adding a comment or a commit to the PR.
After 21 total days of inactivity and 14 days after marking the PR as stale, the Stale Bot will close the PR.
Adding activity to the PR will remove the stale label again and reset the stale timer.
To prevent the bot from adding the stale label to the PR in the first place, the no-stale label can be used.
This label should only be utilized if the PR is blocked by another PR or the PR needs help from another developer.
Further documentation on the Stale Bot can be found here: https://github.com/actions/stale