Integrated Code Lifecycle
Artemis' Integrated Code Lifecycle consists of two main components: Local Version Control and Local Continuous Integration.
General Information
Artemis offers the Integrated Code Lifecycle (ICL), a comprehensive feature designed to streamline the development process for programming exercises. ICL combines version control, secure communication, and continuous integration to provide a seamless experience for students and instructors. Understanding these components is crucial for effectively using Artemis, especially if you're new to concepts like SSH and Git. The key components of ICL are:
- Local Version Control: Use the Local Version Control to interact with the repositories of programming exercises.
- Repository Authentication Mechanisms: The different available and configurable repository authentication mechanisms.
- Tokens: Use VCS access tokens to perform Git operations on repositories.
- SSH: Use SSH to perform Git operations on repositories.
- Local Continuous Integration: Exercise submissions are built and tested by the Local CI system.
Continuous Integration
Continuous Integration (CI) is a software development practice where developers frequently merge their code changes into a shared repository. Each change is automatically built and tested, which helps to:
- Detect and address integration issues early
- Ensure code quality and consistency
- Streamline the development process
Artemis Local CI is our implementation of these CI principles, tailored to support the Artemis learning platform. It provides tools and views to help users build and test in programming exercises effectively.
This document will introduce you to the key components of Artemis Local CI: the Build Agent View and the Build Overview View. These tools will assist you throughout your development workflow on the Artemis platform.
Build Agent View
Artemis offers a build agent view that shows the status of all build agents in the system. This view is available only to Administrators. The build agent view consists of two parts: the Build Agent Summary View and the Build Agent Details.
The Build Agent Summary View shows a list of all build agents in the system, along with their status (idle and running), maximum number of concurrent builds, and running builds. The running builds can be canceled individually by clicking the red cancellation button next to the build. An Administrator can also cancel all running builds on a build agent by clicking the 'Cancel All' button. Administrators also have the option to pause all build agents, which will prevent all build agents from accepting new build jobs. All build agents can also be resume with a button. They can also clear distributed data, this includes the build job queue, the results queue, the processing jobs distributed map, and the build agent information map.

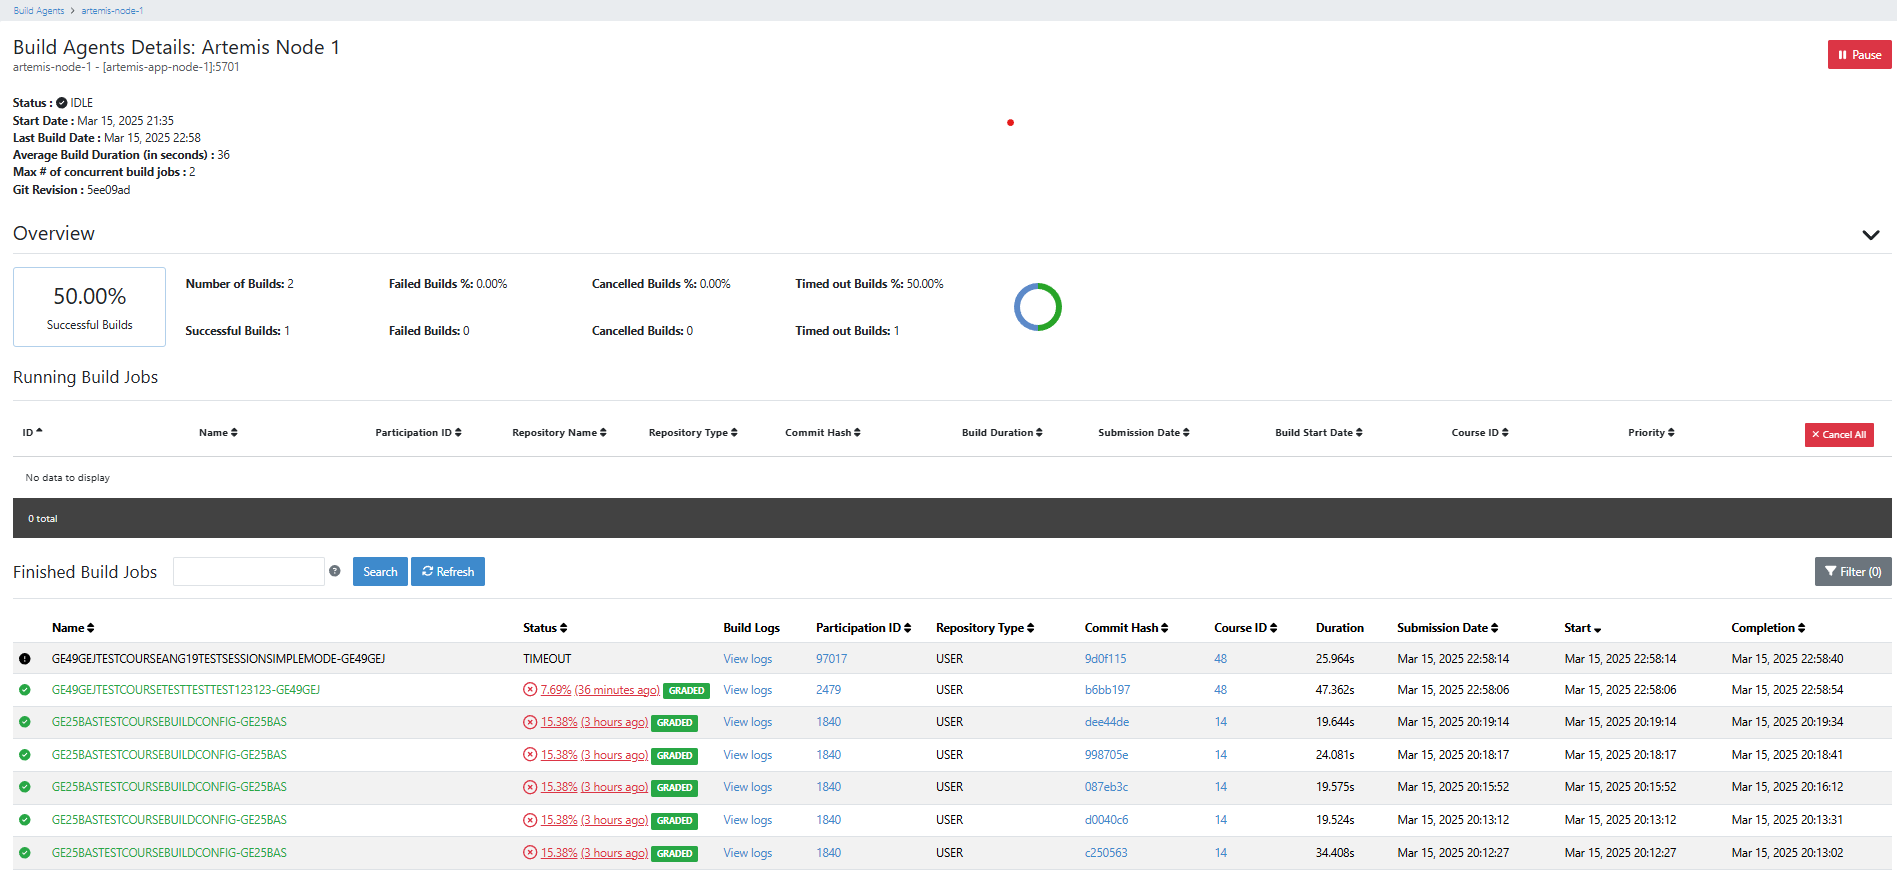
The Build Agent Details View provides detailed information about a selected build agent.
At the top, the view displays the build agent’s status, start and last build dates, average build duration, the maximum number of concurrent builds allowed on the agent, and the current Git revision. Administrators can pause the build agent using the Pause button.
The Overview section presents a summary of build statistics, including the number of builds, successful builds, failed builds, canceled builds, and timed-out builds. A circular progress indicator visually represents these statistics. This section tracks data since the last boot-up of the build agent. If the build agent restarts, all values in this section reset. However, pausing the build agent does not affect these statistics.
The Running Build Jobs section lists all currently active build jobs on the agent, displaying details such as the job ID, repository name, commit hash, submission date, build duration, and priority. Administrators can cancel all running jobs using the Cancel All button.
The Finished Build Jobs section shows recent build jobs processed by the agent, including the job name, status, participation ID, commit hash, course ID, submission date, build start time, and build duration. Clicking on the participation ID navigates to the submission page, while selecting the commit hash leads to the commit details page. The course ID links to the course management page. A search function and filtering options allow administrators to find specific finished jobs, and the Refresh button updates the displayed information.
Build Overview View
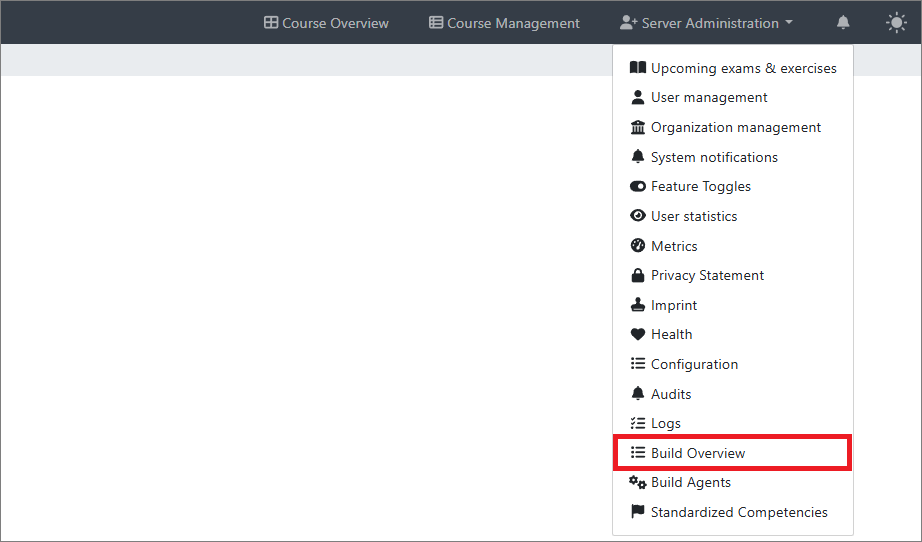
Artemis provides a build overview view that displays all queued, running, and finished build jobs. Access to the system-wide build overview is exclusively available to Administrators through the System Administration menu.
Instructors can access the build overview for a specific course through the Build Overview button located in Course Management. This view displays only the queued, running, and finished build jobs associated with the selected course.

The build overview view is divided into three sections:
Running Build Jobs
The "Running Build Jobs" section displays all build jobs currently being executed by a build agent. Jobs are dynamically added to and removed from the queue in real-time. Users have the ability to cancel any job in progress. The table provides the following information:

Queued Build Jobs
The "Queued Build Jobs" section lists all build jobs currently awaiting execution. Jobs are continuously added to and removed from the queue in real-time. Users also have the option to cancel any job that is queued. The table below displays the following information:

Finished Build Jobs
The "Finished Build Jobs" section displays all build jobs that have concluded, whether successfully completed, with or without a result, failed, or cancelled. Information about finished build jobs is progressively loaded as the user navigates through the pages. Instructors can also access build logs with detailed information about the build execution by clicking on View build logs. This is particularly helpful for failed builds. The table provides the following information:

Local Version Control – Instructor Repositories
As an instructor, you can use the repository to view the submissions of your students. For this purpose, you need to navigate to the exercise participations page. Here you can see all the students’ participations for the exercise and navigate to the repository of a student by pressing the 'Code' button and clicking on . This will show the repository of the student just like it is shown to the student.
 .
This will show the repository of the student just like it is shown to the student.
.
This will show the repository of the student just like it is shown to the student.
You can also see the repositories for an exercises solution, template and test repositories on the exercise management page. You can navigate to these repositories by pressing the 'Code' button and clicking as described above.

Repository access and automatic tokens for course staff
Artemis prioritizes automatically generated, narrowly scoped access tokens so that course staff rarely need a password for Git operations. Whenever such a token can be provided for the repository you open, it is generated automatically and pre-selected in the code button dialog, already embedded in the HTTPS clone URL. Each token stays limited to a single repository, which keeps password authentication, the least secure option, out of everyday staff workflows.
For an even more secure alternative, use SSH. It needs a one-time key setup and is the recommended choice for repeated Git access across many repositories.
What each role may do per repository
What you can do with a repository depends on your role in the course. For example, a tutor can read the template repository, while an editor or instructor can read and push to it.
| Repository | Student | Tutor | Editor | Instructor |
|---|---|---|---|---|
| Assignment (student participation) | Read and write (own only) | Read | Read and write | Read and write |
| Template | No access | Read | Read and write | Read and write |
| Test | No access | Read | Read and write | Read and write |
| Solution | No access | Read | Read and write | Read and write |
| Auxiliary | No access | Read | Read and write | Read and write |
A student can only access their own assignment repository, and write access to it may additionally be limited by the exercise due date and repository locking.
Which scoped token is provided automatically
| Who | Repository | Automatically generated token |
|---|---|---|
| Student | Own assignment repository | Participation token |
| Tutor, editor, instructor | Template, test, solution, auxiliary | Repository token |
| Tutor, editor, instructor | Student assignment repositories | Repository token |
A scoped token only identifies you; it never widens your access. The permissions in the matrix above are re-evaluated on every Git operation, so a tutor's repository token grants read-only access while an editor's grants push access.
Repository-scoped staff tokens
Course staff (tutors, editors, and instructors) receive a repository-scoped token for the template, test, solution, and auxiliary repositories of a programming exercise. Like the participation token for students, it is provisioned automatically and provided through the code button dialog. This means staff can clone base repositories over HTTPS without entering an account password.
The same applies to an individual student's assignment repository: when staff open the clone dialog for a student's repository in course management, a repository-scoped token for exactly that repository is provisioned automatically, so staff can work with a specific student repository over HTTPS without falling back to a broad personal token or a password. Such a student-repository token is only ever created for the exact repository a staff member opens, and only for staff who may already read that repository.
The token is bound to exactly one repository URI. For example, a token generated for the template repository cannot be used for the solution, test, auxiliary, or any student assignment repository. The token only authenticates the user; the usual permission checks still apply on every Git operation, so it can never widen a user's access (for instance, a tutor's token stays read-only even on a student repository).
Repository-scoped staff tokens are created in the following situations:
- when staff open the clone dialog for a base repository or a student's assignment repository and no token exists yet
- when staff are added to a course through course management
- when a programming exercise is created or updated
For regular course exercises, they are removed automatically when the user is no longer staff in the course. They are also removed when the programming exercise is deleted, when the linked student participation is deleted, or when the user account is deleted. You can additionally review and revoke your own tokens at any time (see below).
Viewing and revoking your access tokens
Every user can review the VCS access tokens they own under User Settings → Access Tokens. The overview lists your participation tokens and any repository-scoped staff tokens, showing which exercise and repository each one grants access to. It never shows the token value itself, only this metadata.
From the overview you can revoke an individual token. Revoking a token immediately invalidates it. A fresh token is created automatically the next time you open that repository's clone dialog, so revoking a token never permanently locks you out of a repository you are allowed to access. This applies to all automatically provisioned tokens: your participation tokens as well as repository-scoped staff tokens for base and student assignment repositories.

Instructor user access tokens
Instructors can create a user access token in Profile > Settings > VCS token. This token is broader than a repository-scoped token: it can authenticate Git operations for all repositories that the user account is allowed to access. Use it when you need one token for several repositories or for automation. For everyday staff access to individual student assignment repositories, prefer the automatically provisioned repository-scoped token instead.
Treat user access tokens like passwords. Never share them, never commit them to version control, and revoke them immediately if they might have been exposed.
Choosing an authentication method
Repository-scoped staff tokens are the default choice for template, test, solution, and auxiliary repositories because they require no setup and stay limited to one repository. SSH is the best choice for repeated work across many repositories after you have configured an SSH key in your account settings. Instructor user access tokens are useful when you need a single HTTPS token for multiple repositories. Password authentication should be avoided where possible and may be disabled by the system administrator.