Integrated Code Lifecycle
Artemis' Integrated Code Lifecycle consists of two main components: Local Version Control and Local Continuous Integration.
General Information
Artemis offers the Integrated Code Lifecycle (ICL), a comprehensive feature designed to streamline the development process for programming exercises. ICL combines version control, secure communication, and continuous integration to provide a seamless experience for students and instructors. Understanding these components is crucial for effectively using Artemis, especially if you're new to concepts like SSH and Git. The key components of ICL are:
- Local Version Control: Use the Local Version Control to interact with the repositories of programming exercises.
- Repository Authentication Mechanisms: The different available and configurable repository authentication mechanisms.
- Tokens: Use VCS access tokens to perform Git operations on repositories.
- SSH: Use SSH to perform Git operations on repositories.
- Local Continuous Integration: Exercise submissions are built and tested by the Local CI system.
Local Version Control
Repository View
Programming exercises use a version control system called Git. Git is a distributed version control system that allows you to track changes in your code. These changes are stored in a repository. A repository is a collection of files and directories that are tracked by Git. How to navigate through the repository and view the code is explained in the following sections. This guide is divided into two parts: one for students and one for instructors. It is demonstrated using course programming exercises, but the same principles apply to exams as well.
Access Repositories as a Student
As a student, you can use the repository to view your course submissions. To access your submissions, you need to navigate to the exercise, press the 'Code' button, and click on


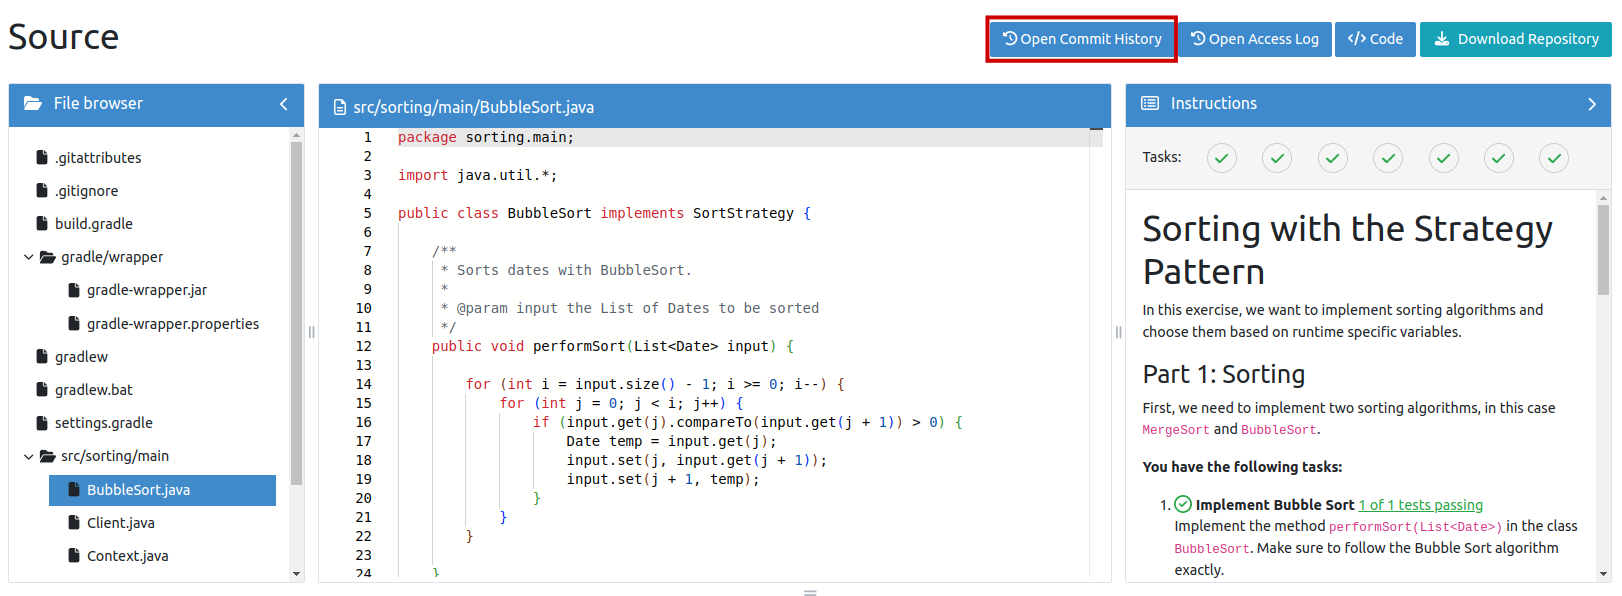
After pressing the button, you will be redirected to the Current Repository Content page of the repository. This view shows the current content of the repository with the latest changes in a read-only code editor. You can view the code, but you cannot edit it. You can also navigate through the whole code by clicking on the file names in the file browser on the left side. To the right side of the screen, above the problem statement, you can see the result of the submission. You can also copy the repository URI by pressing the 'Code' button to clone the repository to your local machine and see the full commit history by pressing the 'Open Commit History' button. Finally, you can download the repository as a ZIP file by pressing the 'Download Repository' button.
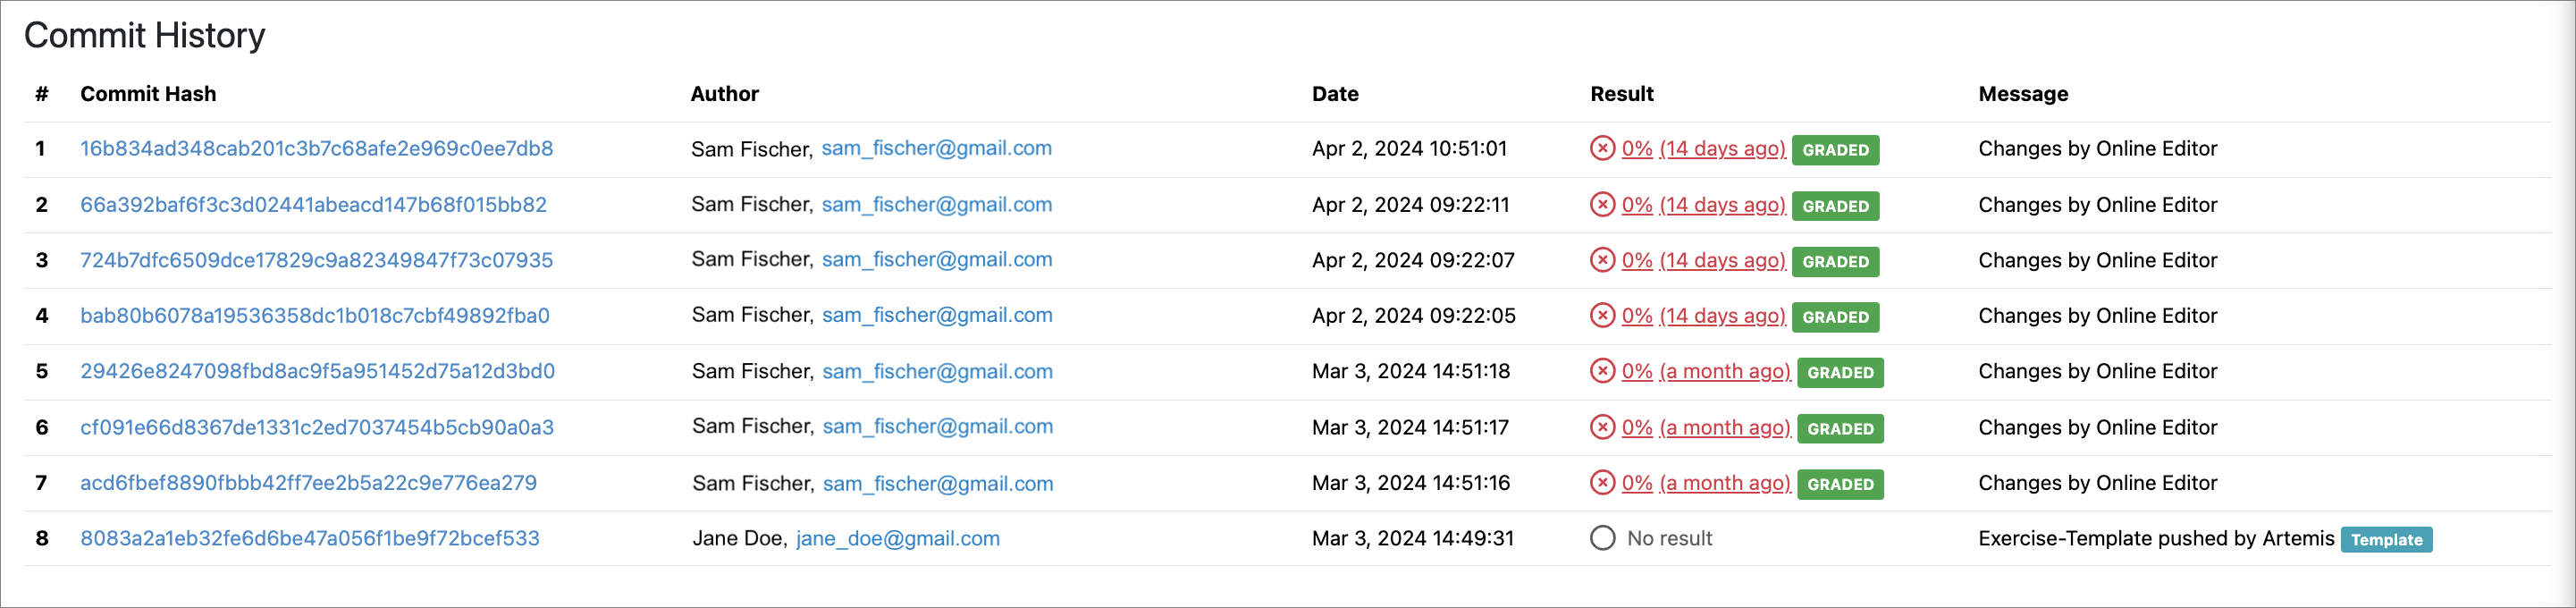
The Commit History page shows all the commits that you uploaded to the repository. The commits are ordered from the latest to the oldest. You can see the commit message, the author of the commit, the date of the commit, the commit hash and the result of the commit. If you created a submission with multiple commits, you can see all of them here but only the last commit has the result of the submission. Lastly, you can also view the code of the commit by pressing on the commit hash.
By clicking on a commit hash, you are redirected to the Commit Diff page. This page shows the changes that you made in this commit. You can see the changes in the code, the files that have been added, the files that have been deleted and the files that have been modified. Green color indicates the lines that have been added and red color indicates the lines that have been deleted. You can also see the commit message, the author of the commit, the date of the commit and the commit hash.

Authentication Mechanisms

Artemis supports three mechanisms for authenticating to repositories: password authentication, token authentication and authentication via SSH. Admins can configure which mechanisms should be available for users, and the order in which they appear in the code button drop down, as described in the Artemis configuration.
There are two types of tokens: Each student has a token, for every repository of exercises they participate in, which Artemis automatically generates and provides through the code button dialog. Instructors additionally have the ability to create an access token, with the ability to access all repositories their user account has permissions to. Find more information on repository types and access rights in the documentation on repository types and access. Here is a short overview on the advantages and disadvantages of the provided mechanisms:
Password
Advantages
- easy to use
Disadvantages
- slow with external authentication
- insecure (when user has weak password)
- not available to all universities
User Token
Advantages
- easy to use, simple setup and revocation
- useful for repository access via API
- secure
Disadvantages
- dangerous if it gets leaked
Participation Token
Advantages
- easy to use, no setup needed
- limited access scope to a single exercise
- secure
Disadvantages
- only usable for one repository
SSH
Advantages
- secure
- industry standard for use with git
- easy to use after correct set up
Disadvantages
- slower than HTTPS
- can be difficult to use
- can be overwhelming for new users
The participation token is the recommended authentication method for students due to its simplicity, security, and lack of setup requirements. While SSH provides strong security, its complexity and setup challenges may make it less convenient. Password authentication remains the default but should be used with caution — admins are encouraged to disable it when possible or enforce strong password policies to enhance security. Therefore, the generally suggested order of authentication mechanisms would ideally be: token, SSH, and lastly password.
Cloning a repository
Using the chosen mechanism, you can use Tower <https://www.git-tower.com/>, git from the terminal <https://git-scm.com/downloads/>, or any other client <https://git-scm.com/downloads/guis/>_ you like to clone your Git repository.
These instructions show you how to clone your repository using Git from the terminal.
From the exercise view, click the code button to display the Clone dialog. Copy the clone URL (either the SSH format or the HTTPS, with or without token). If you are using the SSH protocol, ensure your public key is stored in your Artemis account settings and loaded on the local system to which you are cloning. From a terminal window, change to the local directory where you want to clone your repository.
Paste the link you copied from Artemis, for example:
Clone over HTTPS:
git clone https://username@artemis.tum.de/course/documentation-tests.git
Clone over HTTPS with access token:
git clone https://username:<your-access-token>@artemis.tum.de/course/documentation-tests.git
Clone over SSH:
git clone ssh://git@artemis.tum.de/course/documentation-tests.git
If the clone was successful, a new sub-directory appears on your local drive. This directory has the same name as the repository that you cloned. The clone contains the files and metadata that Git requires to maintain the changes you make to the source files.
VCS access tokens
The tokens for student repositories are automatically created, and provided to the student via the code button dialog. For every student's exercise, Artemis automatically generates an access token, only associated with the repository of this particular exercise.
Instructors can create HTTP access tokens for repository access in Artemis. They are created in the account settings and are used in place of passwords for Git over HTTPS. You can use these to authenticate to the Artemis Local Version Control.
Warning: Never share your access tokens or commit them to version control. Treat tokens like passwords. If a token is compromised, revoke it immediately and create a new one.
Token Creation as Instructor
- Go to Profile > Settings > VCS token.
- Create a new token.

Using SSH keys to secure Git operations
Artemis provides a simple way for users to connect securely to repositories, using SSH to perform Git operations. Next is a small and basic introduction to SSH, and if you already know it, there is a guide on how to create SSH keys. If you already have an SSH key, learn how to add it to your Artemis account.
SSH
Artemis uses SSH as a simple way for users to connect securely to repositories to perform Git operations.
What is SSH?
SSH (Secure Shell) is a protocol that allows you to securely connect to another computer over a network. It's mostly used by system administrators, developers, and IT professionals to remotely manage servers or computers. SSH provides a secure and encrypted communication channel between your computer and a remote machine, so any data passed (like passwords or commands) is protected from eavesdropping. In Artemis you can use SSH to access your repositories with Git.
Why use SSH?
The main advantage of SSH is security. When you connect to a remote machine using SSH, all the data exchanged between your computer and the server is encrypted. This means if someone tries to intercept the communication, they can't read it. It's like sending messages through a locked box that only you and the server can open.
How does SSH work?
SSH works by using two components:
- Client: The computer you are using to connect.
- Server: The machine you want to connect to.
When you want to connect, your SSH client sends a request to the server. If the connection is successful, you can log in to the server and start working as if you were sitting in front of it. The connection uses SSH keys for authentication. Although it is also possible to use username and password to connect over SSH, this is discouraged.
What are SSH Keys?
SSH keys are a more secure alternative to passwords for logging into a server. They are based on public-key cryptography and come in pairs: a public key and a private key.
- Public Key: This key is stored on the server. Think of it like a lock that only you can open.
- Private Key: This key stays on your local machine (never shared!). It's like the key to that lock.
When you try to connect to the server, your computer proves it has the private key that matches the server's public key, granting you access. You can add a personal SSH key to your user account to easily authenticate when performing read operations from your local machine. An Artemis user can currently add one key to their account. For instructions on how to add your SSH key to your Artemis account, please refer to the relevant documentation.
Before you can use SSH keys to secure a connection with Artemis the following must have already been done:
- SSH is enabled on your university's Artemis instance.
- You need an SSH key.
Note:
- You can use the same SSH key for multiple repositories or projects.
- An Artemis user can currently only add one key to their account.
- Artemis supports ECDSA, RSA2, and Ed25519 key types.
Creating SSH keys
SSH keys can be used to establish a secure connection with the Artemis Local Version Control, where you are performing Git operations from your local machine. The SSH key needs to be added to Artemis before you can make use of the key.
Creating an SSH key on Windows
1. Check for existing keys
You should check for existing SSH keys on your local computer. Open a command prompt, and run:
cd %userprofile%/.ssh
- If you see "No such file or directory", then there aren't any existing keys: go to step 3.
- Check to see if you have a key already:
dir id_*
If there are existing keys, you may want to use those: add your key to Artemis.
2. Back up old SSH keys
If you have existing SSH keys, but you don't want to use them, you should back those up. In a command prompt on your local computer, run:
mkdir key_backup
copy * key_backup
3. Generate a new SSH key
If you don't have an existing SSH key that you wish to use, generate one as follows:
- Log in to your local computer as an administrator.
- In a command prompt, run:
ssh-keygen -t ed25519 -C "your_email@example.com"
Associating the key with your email address helps you to identify the key later on. Note that the ssh-keygen command is only available if you have already installed Git (with Git Bash). You'll see a response similar to this:
C:\Users\artemis>ssh-keygen -t ed25519 -C "your_email@example.com"
Generating public/private ed25519 key pair.
Enter file in which to save the key (/c/Users/artemis/.ssh/id_ed25519):
- Just press
<Enter>to accept the default location and file name. If the .ssh directory doesn't exist, the system creates one for you. - Enter, and re-enter, a passphrase when prompted. The whole interaction will look similar to this:
C:\Users\artemis>ssh-keygen -t ed25519 -C "your_email@example.com"
Generating public/private ed25519 key pair.
Enter file in which to save the key (/c/Users/artemis/.ssh/id_ed25519):
Created directory '/c/Users/artemis/.ssh'.
Enter passphrase (empty for no passphrase):
Enter same passphrase again:
Your identification has been saved in c/Users/artemis/.ssh/id_ed25519.
Your public key has been saved in c/Users/artemis/.ssh/id_ed25519.pub.
The key fingerprint is:
SHA256:wvaHYeLtY6+DlvV5sFZgDi3abcdefghijklmnopqrstuvw your_email@example.com
- You're done and you can now add your key to Artemis.
Creating an SSH key on Linux & macOS
1. Check for existing SSH keys
You should check for existing SSH keys on your local computer. Open a terminal and run:
cd ~/.ssh
If you see "No such file or directory", then there aren't any existing keys: go to step 3.
Check to see if you have a key already:
ls id_*
If there are existing keys, you may want to use those: add your key to Artemis.
2. Back up old SSH keys
If you have existing SSH keys, but you don't want to use them, you should back those up. In a command prompt on your local computer, run:
mkdir key_backup
cp * key_backup
3. Generate a new SSH key
If you don't have an existing SSH key that you wish to use, generate one as follows:
- Open a terminal on your local computer and enter the following:
ssh-keygen -t ed25519 -C "your_email@example.com"
Associating the key with your email address helps you to identify the key later on. You'll see a response similar to this:
artemis@homemac ~ % ssh-keygen -t ed25519 -C artemis@email.com
Generating public/private ed25519 key pair.
Enter file in which to save the key (/Users/artemis/.ssh/id_ed25519):
- Just press
<Enter>to accept the default location and file name. If the .ssh directory doesn't exist, the system creates one for you. - Enter, and re-enter, a passphrase when prompted. The whole interaction will look similar to this:
artemis@homemac ~ % ssh-keygen -t ed25519 -C artemis@email.com
Generating public/private ed25519 key pair.
Enter file in which to save the key (/Users/artemis/.ssh/id_ed25519):
Enter passphrase (empty for no passphrase):
Enter same passphrase again:
Your identification has been saved in /Users/artemis/.ssh/id_ed25519.
Your public key has been saved in /Users/artemis/.ssh/id_ed25519.pub.
The key fingerprint is:
SHA256:gTVWKbn41z6JgBNu3wYjLC4abcdefghijklmnopqrstuvwxy artemis@email.com
The keys randomart image is:
+--[ED25519 256]--+
|==+.    +o..     |
|.oE.   +o..      |
|    . ...o       |
|     .o...       |
|     oo+S  .     |
|  + ..B = . .    |
|.+.+.oo+ * o .   |
|o++.o+  . + +    |
|B+ o.    .   .   |
+----[SHA256]-----+
artemis@homemac ~ %
- You're done and you can now add your key to Artemis.
Using SSH with Artemis
You can use SSH keys to establish a secure connection between your computer and Artemis when you are performing Git operations (pull, clone, push) from your local machine. Personal keys are linked to your Artemis account, inheriting its permissions and operating under its unique identity. To use your generated SSH keys with Artemis, you need to add it in the account settings.
Add an SSH key to your Artemis account
1. Copy your public key
On Windows in your command prompt, change directory to your .ssh directory, and copy the public key file to your clipboard by running:
cd %userprofile%/.ssh
clip < id_ed25519.pub
On macOS or Linux simply run the following in a terminal:
pbcopy < ~/.ssh/id_ed25519.pub
If pbcopy isn't working, locate the hidden .ssh folder, open the file in a text editor, and copy it to your clipboard. On Linux, you may need to download and install xclip, then use that:
sudo apt-get install xclip
xclip -sel clip < ~/.ssh/id_ed25519.pub
Note that the key's name is not necessarily id_ed25519.pub, but can be arbitrary, and depends on how you saved it.
2. Add the key to your Artemis account
Open the settings, go to the SSH tab, and select 'New Key'. Then paste the copied SSH key into the text box.


3. Save the key. You're done!
Use SSH to connect to Artemis repositories
After everything is set up, you can go to a programming exercise, and use the SSH clone URL with git to access the repository locally, like this, for example:
git clone ssh://git@artemis.cit.tum.de:7921/git/COURSE/exercise-user_1.git